Messages
The Messages Tab provides a breakdown of all the messages asked to your AI Assistant.
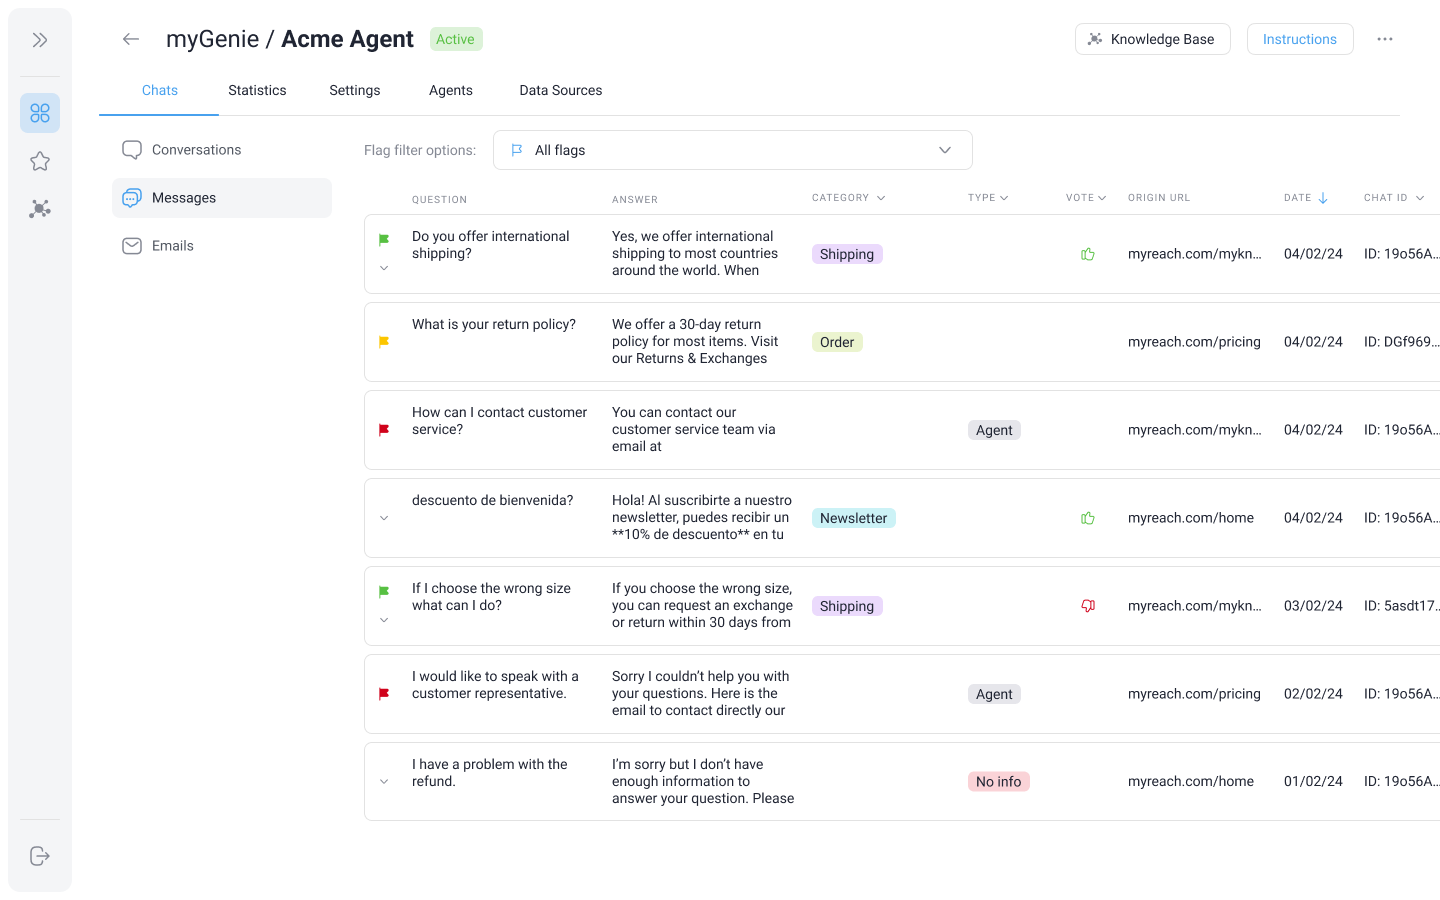
Each row represents an individual message. So if there are multiple messages within one session, each message (and answer) appear in a separate row. This is different to the Conversations section which incorporates all the individual messages into one row.
Flags
You can flag specific messages with custom flags – useful for messages that need further review, hold special significance or stand out for a certain reason.
Create flags in the "Flag filter options" at the top of the page. There you can create and edit your custom flags and add a different colour for each to differentiate them easier.
To add a flag to a message, hover over it and you will see the flag appear to the left of the question. Click on it to add a flag.
The options and uses of flags are endless, depending on your use case. Here are a couple of examples of flags you could create: - "Check Later" – Questions to review, if there is something missing in content, or you need to review the information in the knowledge base. - "Perfect" – Questions that have been answered perfectly well. Useful to keep as a reference, or show senior management at status meetings, etc. You can also create a range of flags to mark the quality of the answer: incorrect, poor, average, good, perfect.
Overview of columns
There are several columns for each message, which help to sort through and understand messages. For any message, you can click on it to open the chat session ID and see the conversation history with that person.
Here is a breakdown of all the columns:
-
Question: The actual question asked by the user. On the left side of the question is where Flags appear.
-
Answer: The answer provided by the Genie. If the answer is too long, there is an option to expand the component to view the complete answer (downwards pointing arrow on the left of the question).
-
Category: The category (or categories) that the answer is related to, if any. This is detected automatically by the AI, based on the categories you have created. You can filter messages by categories, in the header of the column. If the message belongs to a category that the AI hasn't picked up on, you can manually add it by opening the message and adding the category in the options to the right of the message. Click here to find out more about message categories and how to create them.
-
Type:
- AGENT: Messages where a user has asked to speak to an agent or contact support. When this situation occurs, the message that the AI responds can be customised by going to:
AI > Situation Messages > Speak to an Agent. - NO INFO: Messages where the AI doesn't have any information to answer. Instead of making up an answer, it will respond with something like "I'm sorry but I don't have enough information to answer your question. This text can also be customised by going to:
AI > situation Messages > Unable to Answer.
- AGENT: Messages where a user has asked to speak to an agent or contact support. When this situation occurs, the message that the AI responds can be customised by going to:
-
Vote: Filter messages by those that have received a thumbs up or thumbs down.
-
Origin Url: The url of the page where the question was asked. This is useful to detect where users are asking questions from, if your Genie is embeded as a widget on your website.
-
Date: The date when the message was asked by the user.
-
Comment: You can manually add comments when reviewing messages, and these will be shown here. To add a comment, open the message and you will see a selection of options on the right side of the question. Among these options is one to add a message. This is useful if you're wanting to review things internally with a colleague, or if you've flagged a message and need to add some context or additional thoughts as to why you've flagged it.
-
Chat ID: The unique identifier for the chat session.